
For the purposes of Adobe PDF digital signatures, it is required that your private key be securely generated and stored on an external FIPS-validated hardware device rather than your computer. Users can generate a key pair on an existing YubiKey and an attestation certificate that proves that the private key was generated on the device. The attestation certificate can then be used to obtain certificates from SSL.com that may be installed manually on the YubiKey. An attestation certificate is only valid for one YubiKey. If you need to install your certificate in multiple YubiKeys, you will have to perform an attestation for each token. Please contact support@ssl.com to get more details about multiple issuances of a certificate. This how-to will walk you through: To generate the attestation certificate, use the ykman Command Line Interface (CLI) which is included in this download package: Yubikey Manager.
This guide is only for installing or replacing a document signing certificate on a YubiKey in these cases:
Requirements
To generate the key pair and later on install the document signing certificate, download this tool: Yubico Authenticator Graphical User Interface (GUI).
Upon installation, both of these tools will be stored in your computer’s Yubico folder.
Step 1: Generate Key Pair on YubiKey
- Download Yubico Authenticator.
- Plug in your YubiKey, then launch Yubico Authenticator.
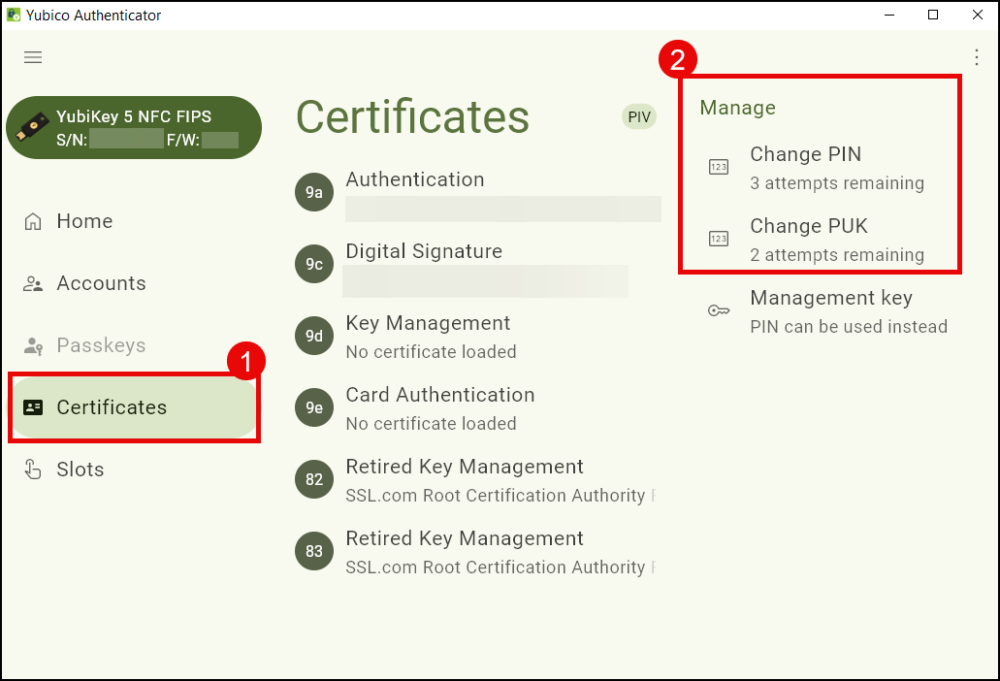
- Under the Certificates section, select the tab corresponding to the YubiKey slot where you intend to generate the key pair. For signing PDF documents, select Digital Signature (slot 9c). Click on Generate Key to proceed.
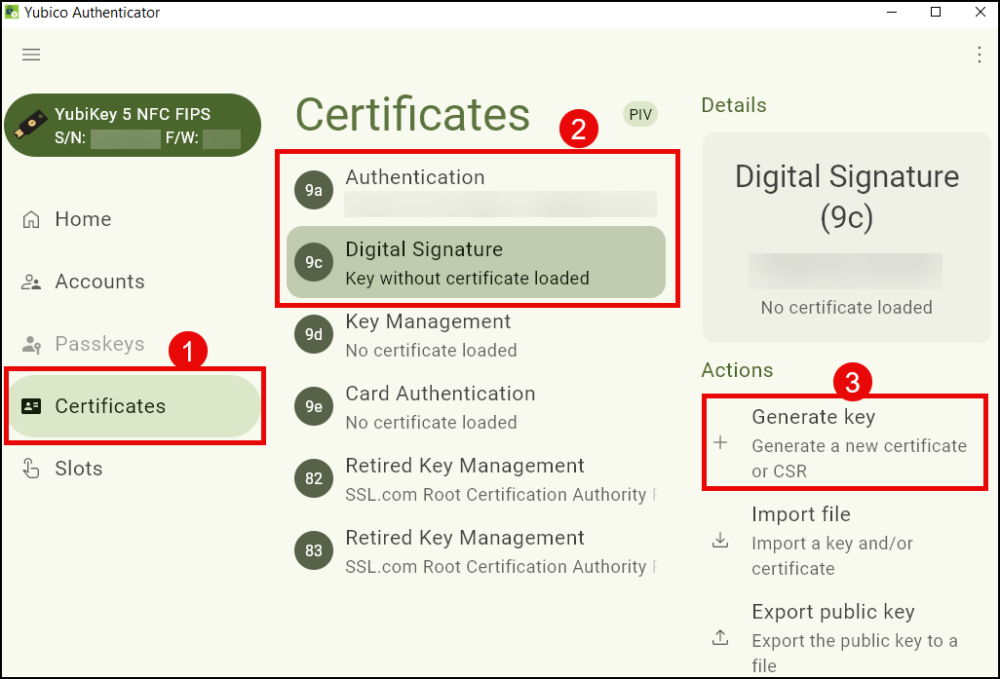
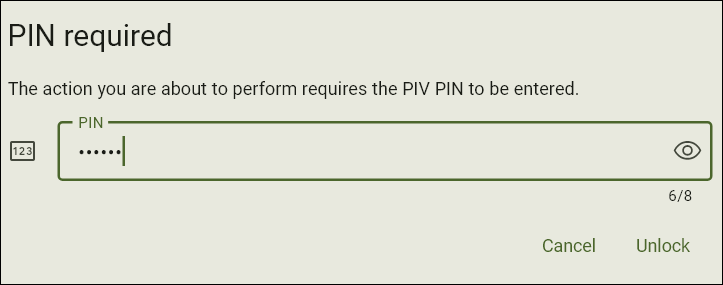
- When asked for your Yubikey PIN, enter the value then click Unlock.
-
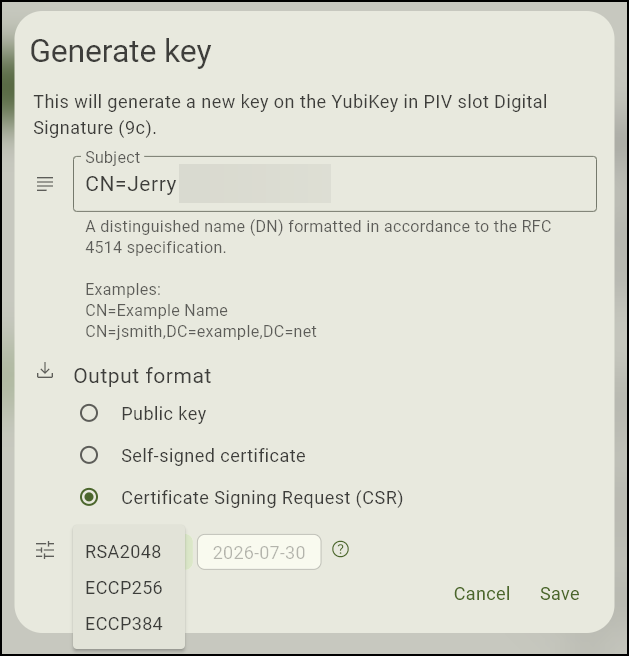
Enter the Distinguished Name (DN) in the Subject field. This value identifies the individual or organization and will appear on any electronic document signed with the certificate.
- Begin the entry with the characters
CN=followed by the name you want displayed, with no space in between. - Example: CN=Example Company
Make sure the name is accurate as it will be visible to end users.
For Output Format, choose Certificate Signing Request (CSR).
From the Algorithm drop-down list, make a selection. For document signing, opt for RSA2048.
Finally, click the Save button.
- Begin the entry with the characters
- Save the CSR certificate in a folder.

Step 2: Generate Attestation Certificate
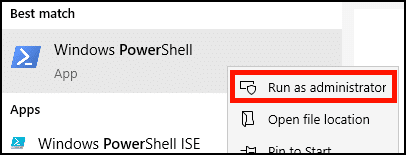
Each YubiKey comes pre-loaded with a private key and certificate from Yubico that allows you to generate an attestation certificate to verify that a private key has been generated on a YubiKey. This operation will require you to use the ykman Command Line Interface (CLI) which is located in the Yubikey Manager folder of your computer. To be able to access ykman CLI, you will need to use Windows PowerShell.
- In Windows, open PowerShell as an administrator. macOS and Linux users should open a terminal window on their device.
-
Use the cd (Change Directory) command to navigate to the YubiKey Manager files and access ykman. To do this on Windows, do the following by order, on the same line on Powershell:
Typecdon PowerShell
Press space
Copy the folder path where ykman is located, then enclose it in double quotation marks. Example:"C:\Program Files\Yubico\YubiKey Manager"Press Enter

- Windows:
cd "C:\Program Files\Yubico\YubiKey Manager"
- macOS:
cd /Applications/YubiKey Manager.app/Contents/MacOS
- On Linux (Ubuntu), the
ykmancommand will already be installed in yourPATH, so you can skip this step.
- Windows:
- After switching to ykman using Powershell, use the command below to generate an attestation certificate which will be in the form of a text file. On Windows, the command will look like this:
.\ykman.exe piv keys attest 9c C:\Folder\Folder\attestation\attestationfilename
Let us break it down:
a. Copy this to Powershell:.\ykman.exe piv keys attest 9c
b. On the same line on Powershell, copy the folder path where you want to store the attestation certificate. Choose/create a folder in your computer. Example:C:\Folder\Folder\attestation.
Make sure to choose/ create folders that have single word names or no space to avoid errors when entering the command on PowerShell.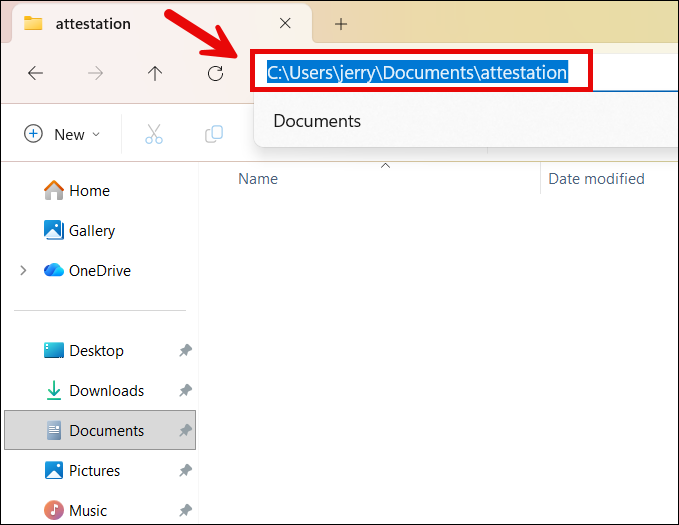
c. Think of a name you want to use for the certificate. Simply navigate to your designated folder and copy the folder path from the address bar. At the end of the folder path add a backslash (\) and the name you want to use for your attestation certificate. Example:\attestationfilename
Make sure to generate a file name that only has letters as characters and no space to avoid errors when entering the command on PowerShell.
d. Press Enter on PowerShell to finally generate the attestation certificate text file.
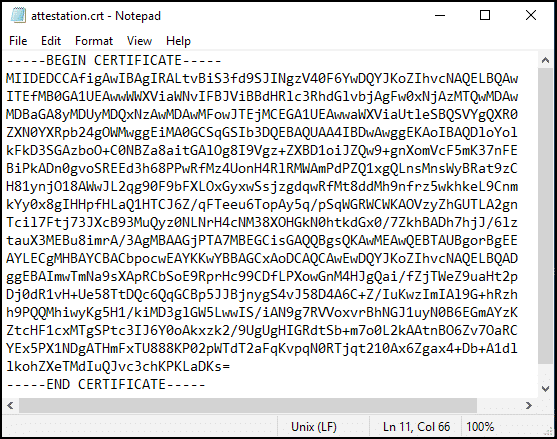
After entering the command, check in your designated computer folder if the attestation certificate was successfully generated. It will be in the form of a text file and bear the name you set for it. When opened, it will display a body of letters and numbers headed by —–BEGIN CERTIFICATE—– at the top and —–END CERTIFICATE—– at the end.
- Windows:
.\ykman.exe piv keys attest 9c C:\Folder\Folder\attestation\attestationfilename
- Linux (Ubuntu):
ykman piv keys attest 9c ATTESTATION-FILENAME.crt
- macOS:
./ykman piv keys attest 9c ATTESTATION-FILENAME.crt
- Windows:
- Next, use the
ykmancommand to export the intermediate certificate from slot f9 of the YubiKey. The certificate will be in a text file format. The command will look like this:.\ykman.exe piv certificates export f9 C:\Folder\Folder\attestation\intermediatefilename
Let us break it down:
a. Copy this on Powershell:.\ykman.exe piv certificates export f9b. Choose or create a folder in your computer (i.e. Documents) where you want the intermediate certificate to be exported. Copy the folder address to Powershell. Example:
C:\Folder\Folder\attestation
c. Create a file name for the intermediate certificate. Add a backslash before the name and append it at the end of the folder address you have copied to Powershell, with no space in between. Example:\intermediatefilename
d. Press Enter. Once you enter the command, the intermediate certificate will appear in the designated folder, bearing the name you set for it. When you open it, it will display a body of letters and numbers headed by —–BEGIN CERTIFICATE—– at the top and —–END CERTIFICATE—– at the end.
-
- Windows:
.\ykman.exe piv certificates export f9 C:\Folder\Folder\attestation\intermediatefilename
- Linux (Ubuntu):
ykman piv certificates export f9 INTERMEDIATE-FILENAME.crt
- macOS:
./ykman piv certificates export f9 INTERMEDIATE-FILENAME.crt
- Windows:
Step 3: Verify Attestation Certificate with SSL.com and Attach to Order
- First, open the attestation and intermediate certificates in a text editor.
- Login to your SSL.com user account and navigate to the Orders tab, then click the details link for the order you wish to associate with the attestation certificate. (This link will change to download after your certificate is issued.)
Note: If you wish to check the validity of your attestation certificate without attaching it to an order, you can use SSL.com’s attestation verification tool.
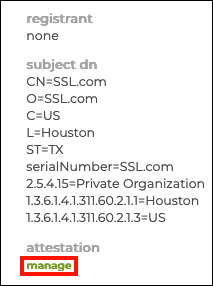
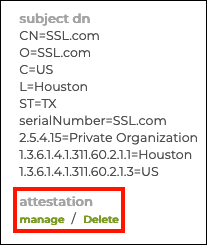
- Click the manage link, under attestation.
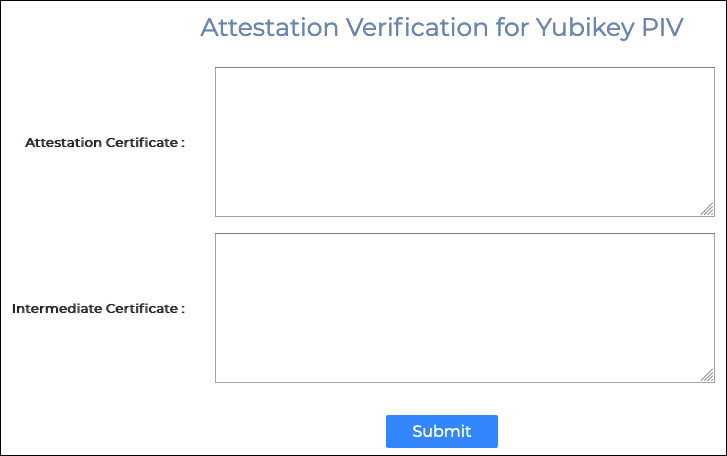
- A new page with fields for the attestation and intermediate certificates will appear.
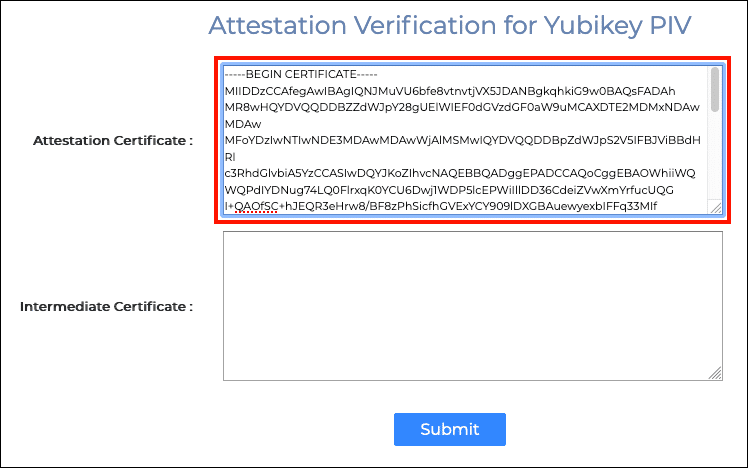
- Paste the attestation certificate into the Attestation Certificate field, making sure to include the lines
-----BEGIN CERTIFICATE-----and-----END CERTIFICATE-----.
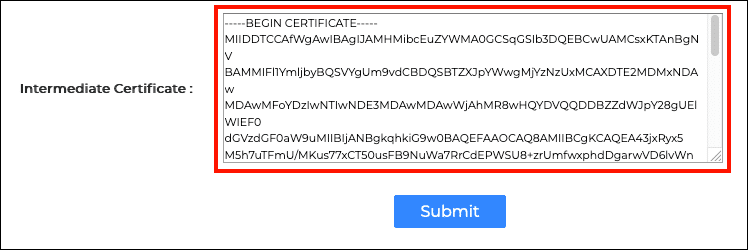
- Next, paste the intermediate certificate into the Intermediate Certificate field.
- Click the Submit button.

- If everything has gone correctly, a green alert will appear at the top of the screen, indicating a successful attestation.

- Return to the order in your account. You can verify that the attestation has been added to the order by the presence of a link labeled Delete under attestation.
Step 4: Download your Document Signing Certificate
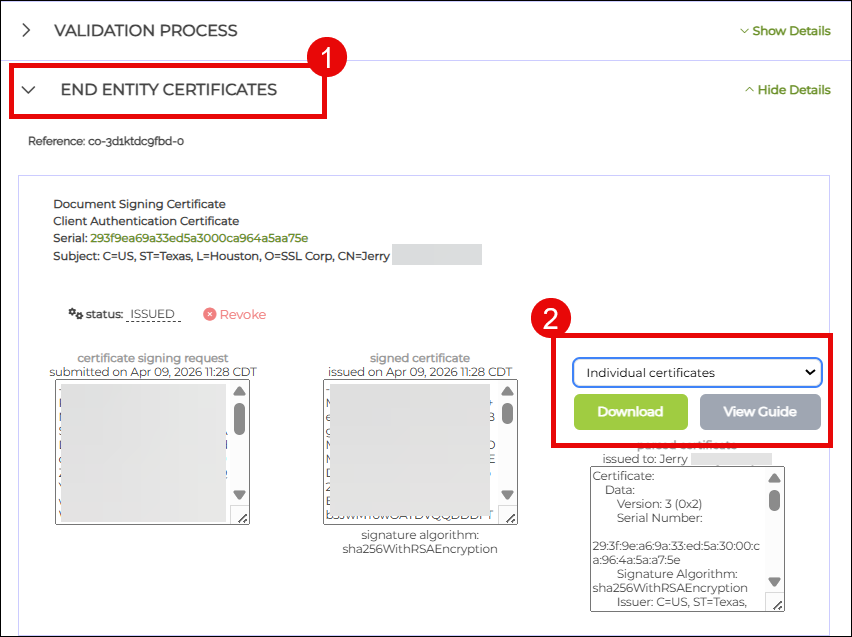
- Once SSL.com approves your attestation and issues the certificate, it can then be downloaded from your user account. To do this, click Orders from the top menu. Locate your certificate order from the list and click the download link.

- Once on the download page, scroll down to END ENTITY CERTIFICATES section and click Show Details. Scroll down to the subsection labeled Document Signing Certificate. To the right, you will see the download format options for your certificate. For a Document Signing Certificate, choose the individual certificates download option. This is a zip file containing three certificate files: your end-entity certificate, an intermediate certificate, and a root certificate.
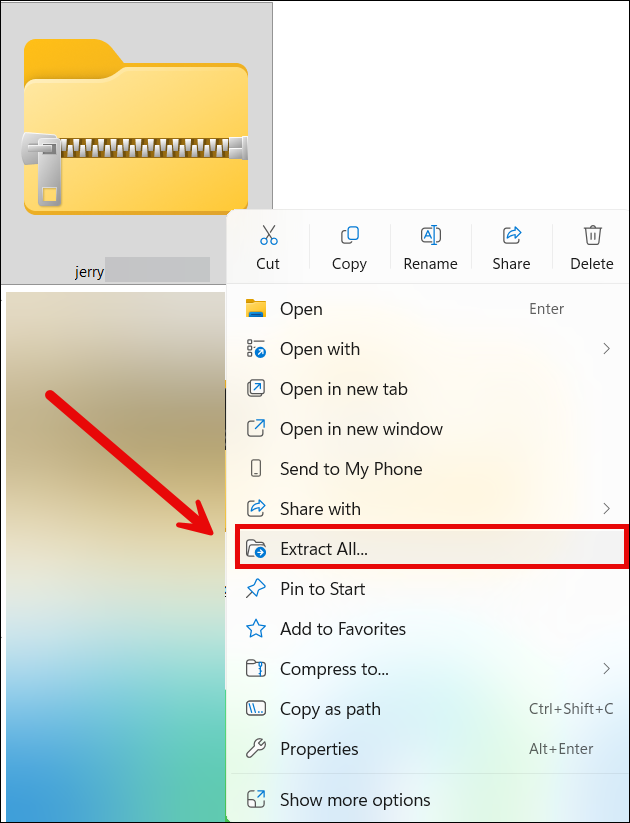
- Right click the downloaded zip file. Click Extract All…
- Choose a location where you want the files to be extracted and then click the Extract button.
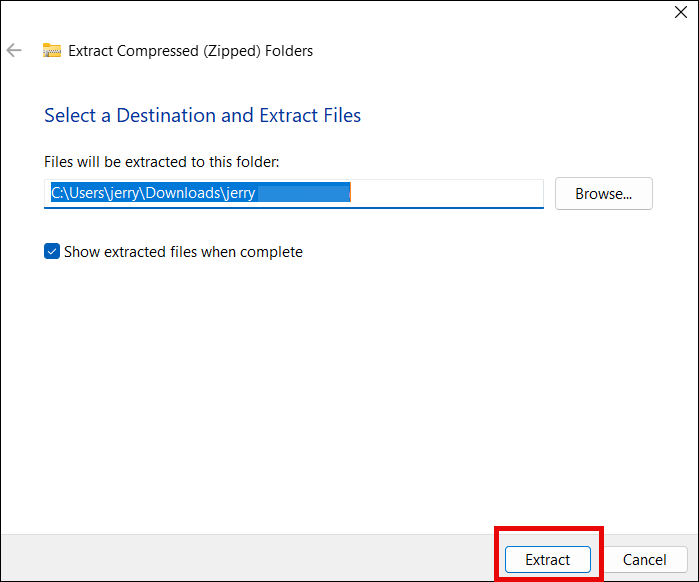
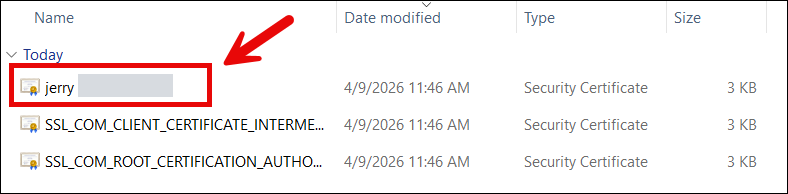
- Open the folder containing the extracted certificates. You will see three certificates but you will only need to install your end-entity certificate which is a .CRT file and bears the name of the person or organization. From here, you are now ready to install your certificate.
Step 5: Install your Document Signing Certificate in YubiKey
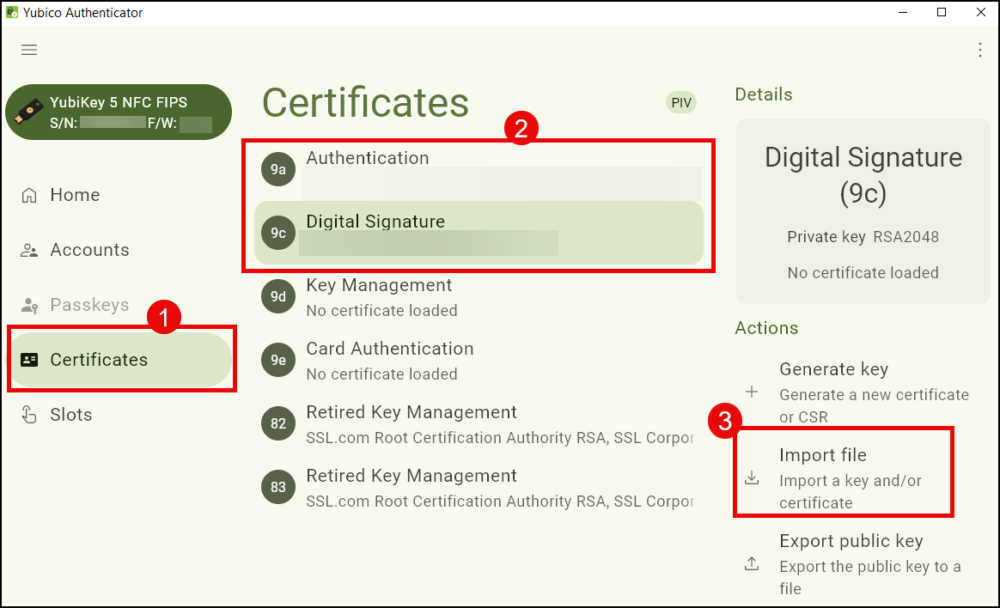
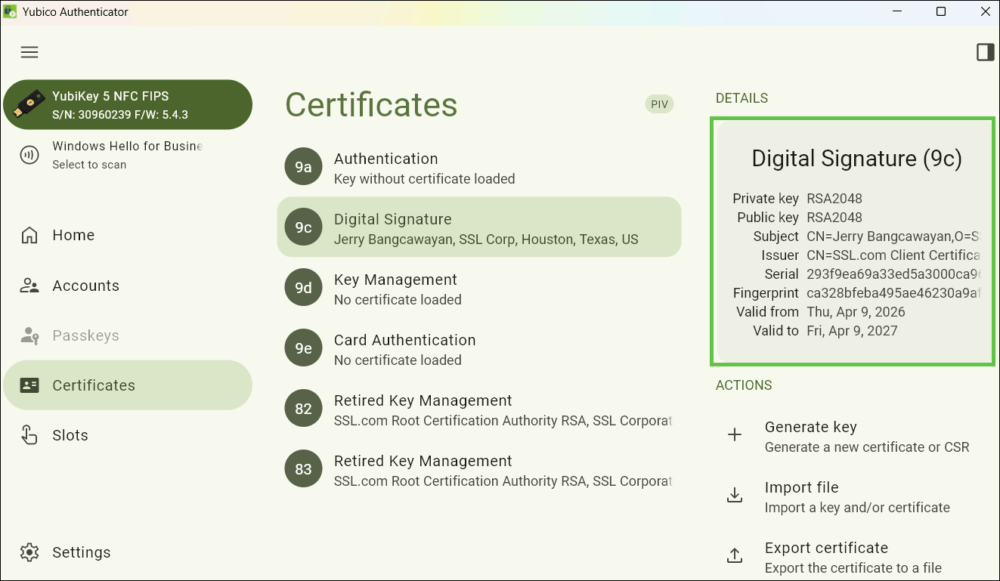
- Open Yubico Authenticator.
- Click Certificates, followed by Digital Signature, and Import file.
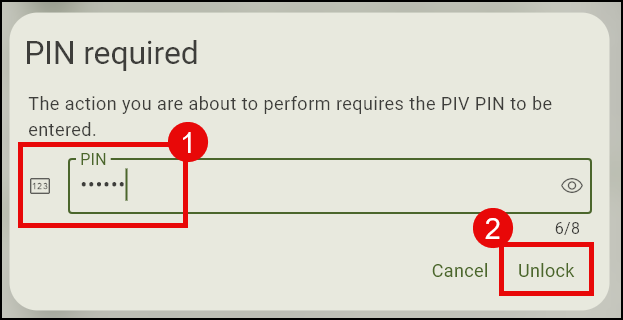
- Enter your Yubikey PIN.
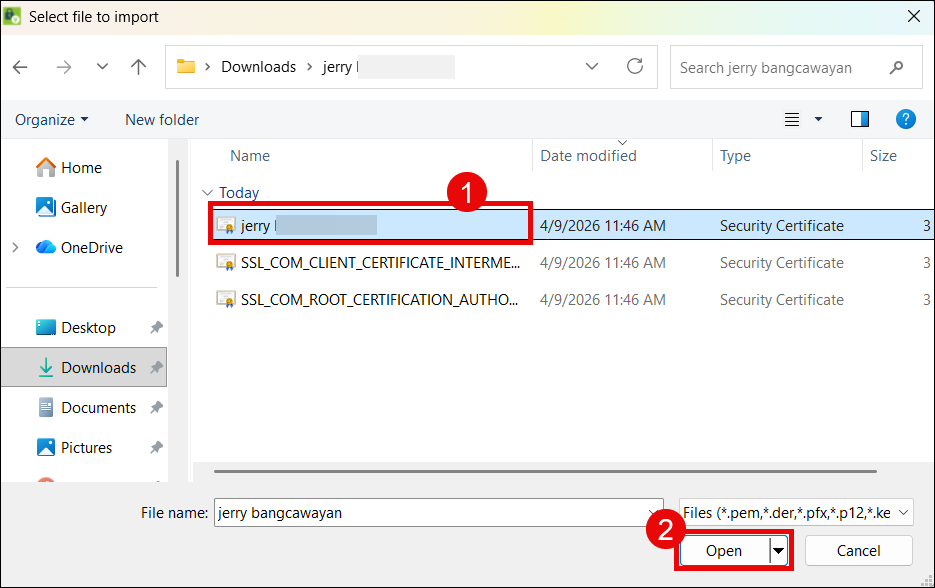
- Navigate to the folder where the certificates were extracted and click your end entity document signing certificate.
- Yubico Authenticator will display the details of your certificate. Click Import button.
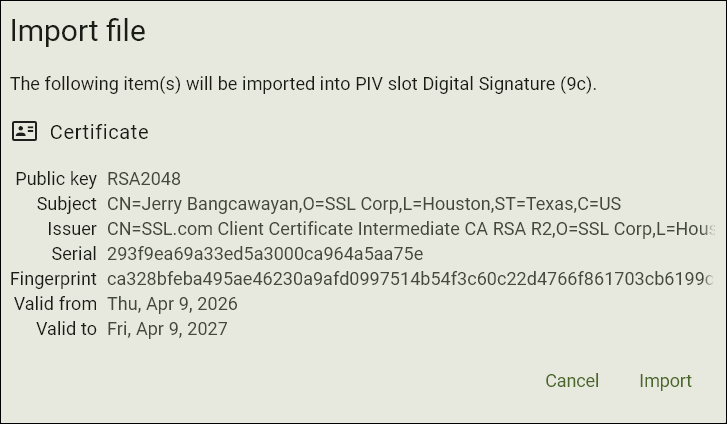
- Your certificate is now successfully installed.
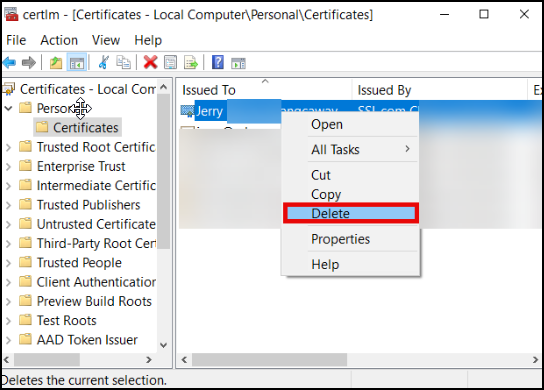
- Optional step: If you are a customer who replaced an expired certificate in your Yubikey, you will also need to delete the copy of the expired cert that is still in the Windows certificate store. To do this, type certmgr on the Windows search bar of your computer. Next, click Manage computer certificates. Click the Personal folder, locate the expired signing certificate, right-click it with your mouse, and choose Delete.
Document Signing Attestation Troubleshooting
If SSL.com rejects your attestation submission, it is due to one of the following
- Step 1: Generate Key Pair on YubiKey
- Your Certificate Signing Request (CSR) is being rejected by Yubico Authenticator
- You have to include the characters
CN=on the Subject field. Yubico Authenticator will reject the CSR if this is not done. - Select a supported algorithm: RSA 2048 is the the only algorithm accepted for document signing certificates.
- You have to include the characters
- Your Certificate Signing Request (CSR) is being rejected by Yubico Authenticator
- Step 2: Generate Attestation Certificate
- You can’t access ykman CLI
- You cannot access ykman by double-clicking the icon for the application on YubiKey Manager. You can only use it by first opening a shell application like PowerShell, then using the Change Directory (cd) command to run it.
- When typing the cd command on PowerShell, there should be a space between cd and the folder path of ykman CLI. Example:
cd “C:\Program Files\Yubico\YubiKey Manager” - The ykman CLI folder path should be enclosed in double quotation marks. Example:
“C:\Program Files\Yubico\YubiKey Manager”
- The attestation and intermediate certificates are not being generated
- Make sure to choose/ create folders that have single word names or no space to avoid errors when entering the command on PowerShell.
- Make sure to generate a file name that is short and single-worded with no special characters to avoid errors when entering the command on PowerShell.
- You can’t access ykman CLI
- Step 3: Verify Attestation Certificate with SSL.com and Attach to Order
- The attestation and intermediate certificates are failing to be submitted on my SSL.com account
- When opening them on a text editor like Notepad, make sure to copy the entire contents of the file including —–BEGIN CERTIFICATE—– at the top and —–END CERTIFICATE—– at the end.
- The attestation and intermediate certificates are failing to be submitted on my SSL.com account
Guides to Digitally Signing Adobe PDF and Microsoft Office Documents with your Yubikey
- Digitally Signing Microsoft Office 365 Documents Using a Yubikey: Step-by-step instructions for installing your document signing certificate and adding or removing digital signatures in Microsoft Office 365.
- Digitally Sign a PDF in Adobe Acrobat Reader Using a YubiKey: A guide on signing PDF documents in Adobe Acrobat Reader using an SSL.com document signing certificate stored on a YubiKey.