
eSigner is an innovative browser-based app that allows users worldwide to secure their electronic documents using a cloud-based document signing certificate.
Users can conveniently login to eSigner from anywhere and add globally trusted digital signatures and timestamps to their documents, with no need for USB tokens, HSMs, or other special hardware.
Below are the instructions on how to sign a document using eSigner.
Options for Signed Document
There are several options you can do to a document signed on esigner.com. These options are listed below:

Below are the instructions on how to sign a document using eSigner.
Getting Started
Create an Account
- Go to esigner.com and click any of the Start free buttons.

- Fill in all the required fields to create your SSL.com Account. These fields include username, First Name, Last Name, email address, and password. Take note of the requirements for an acceptable password. Click the CREATE ACCOUNT button to proceed.

- A new login session will appear. Place your username and password and then click the Member Login button. You can now proceed to create your signing profile and customize your preferred signature.


Create your Signing Profile
- Click Signing Profiles on the menu.

- Click the Create Profile button to create a Signing Profile.

- Place your First Name and Last Name in the allotted fields and then click the Save button.

- Select your choice for your signature.
- Choose
The Choose option provides a set of signature templates bearing your First and Last name. Pick the font style that you want and click the Save button to confirm your choice.

-
Draw
The Draw option enables you to use your mouse to generate your customized signature. This option is good for users who wish to replicate their handwritten signatures on the eSigner app. Should you wish to replace the drawn signature, simply click the trash bin icon to start over.

-
Upload
The Upload option allows a user to use an image as their signature preview. Click the Choose File button to upload the image then click the Save button. Compatible image file types include png, jpeg, and svg.

- Choose


Enable Your Verified ID Badge On Signed Documents
eSigner integrates with an AI Identity Verification software to provide a proof of individual identity for users who sign their documents on esigner.com. Successful verification will grant the user a Verified ID Badge which will be displayed on a document that is signed on esigner.com. Since only valid identification documents can be used to acquire this badge, the person whose name and signature appears on the document can provide an additional strong proof of identity. To enable your Verified ID Badge, please prepare the following:- An active account on esigner.com.
- A valid identification document such as your passport, driver’s license, or an identity card.
- A mobile phone or computer with a web camera
- Click the Signing Profiles tab.

- Click the Enable Your Verified ID Badge On Signed Documents link.

- To continue the automated identity validation process, please refer to this guide, starting on Step 3. Upon approval of your application for identity validation, the badge Government ID Verified will show in your eSigner account.
- On the Signing Profiles section of your account, you will see the label Government ID Verified followed by the name in your ID. A signing profile bearing your name and the label Government ID Verified will be automatically created. This will become your default Signing Profile which you can customize by clicking the Edit button.

- When you use this signing profile to sign your document, the signed document will include a verified ID badge below your name.


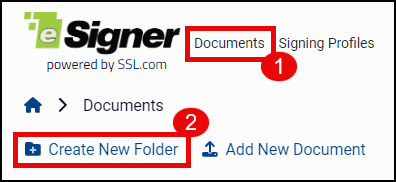
Create a Folder
- Click Documents on the menu followed by either Create New Folder or Create Document. If you will be signing multiple documents, it is advisable to use the Create New Folder option to better organize your files.

- Generate a name for the folder and click the CREATE button.

- To add a document to the folder you created, hover to the folder name to highlight it, and then click to open the folder.

- If your documents require a hierarchy of organization, you can add a sub-folder by again clicking the Create new folder option. If no sub-folders are required, click the Create Document option.


Create and Sign a Document
- To create and sign a document, click Documents on the menu. Select the folder where you want the document to be stored and click the Create Document option.

- Click Choose File to upload the document from your computer and finalize the name you want for it. Finally, click the CREATE button.

- You will be notified that the document for signing has been created, and that you have to add content fields like signature boxes or text fields.

- A preview of your document will appear. Click the ADD ESIGNERS button to select a signing profile that you can use to sign the document.

- Under Select Recipients, click the drop-down arrow to choose the signing profile you want to use for signing. Afterwards, click the SAVE button.

- Click the particular field on the left side of the screen and drag it to the document preview. The available fields include the Signature you created; Date of signing; your First and Last name; a unique QR code; and an alpha numeric series termed eSigner Document ID. You can drag the content field to any position in the document preview by clicking and moving it with your mouse.

- You also have the option to add Terms and Conditions to the signing process. Click the SET TERMS AND CONDITIONS button and attach the terms and conditions either by typing it in the alloted text box or uploading a file by clicking the Choose File button. Proceed to tick the check box if you wish the text/file to be added to the signed document. Once finalized, click the Save Terms and Conditions button.

- Once you have placed all the fields you want, click the SIGN THIS DOCUMENT button. If you have added a set of Terms and Conditions, you will be shown a preview of it so you can confirm. You can also click the link to Terms of Service for using esigner. Afterwards, tick the check box beside: I agree with these terms and to use electronic records & signatures. Finally, click the Continue button.


- Click the START HERE button to initiate the signing process. Proceed to click each of the fields you have added for your document to permanently set them. Fields that are not yet set will have a shimmering light on their edges. Fields that have been successfully set will be watermarked into the document preview.

- You can use the NEXT button to locate all the fields that need to be set. Once all fields have been set, click the FINISH button.

- A brief loading screen will appear indicating that the digital signature and timestamp are being added to the document.

- Upon successful signing, you will see a check mark beside the word Signed.


Options for Signed Document
There are several options you can do to a document signed on esigner.com. These options are listed below: 
-
- Download eSealed Document: Clicking this will download the signed file to your computer.
- Audit Page: Clicking this will download a Certificate of Signature and Timestamp which displays key information, including the name and email address of the document owner; name of the document and date when it was created; details of the document signing certificate that was used; and number of signatories.

- Combined File and Audit Page: As the label suggests, clicking this will download a single pdf copy containing both the signed file and the Audit Page.
- Signed and Audit ZIP: This will download a ZIP file which contains distinct copies of the signed file and the Audit Page.
- Copy Link: This allows you to generate a download link for the signed document and audit page that you can share to your contacts.

- Download eSealed Document: Clicking this will download the signed file to your computer.


Check the Digital Signature on the Signed File
- Open the signed file. If you are using Adobe Acrobat Reader, click the Signature Panel button. You will then see that the document is marked as signed and all signatures are considered valid. You will also be able to see the content fields you selected.


- Click the Show Signature Properties option to see details of the signature. On Signature Properties, you will be able to see that Adobe Reader recognizes the security features acquired from the signing process:
- The document has not been modified since this signature was applied.
- The signer’s identity is valid.
- The signature includes an embedded timestamp.
- Signature was validated as of the secure (timestamp) time.


